Monday, October 30, 2017

Bathroom light fixture


I recently finished the rustic bathroom shelves (after the medicine cabinet died, see previous post) and noticed that the bathroom light fixture was going bad (apparently common for older bathrooms with poor ventilation). Sometimes one or both of the lightbulbs didn't work at all, then would randomly start working again. I checked the light switch to see if it needed to be replaced, but it was fine, so it was time for a new light fixture. I got a $10 light fixture at Walmart. It is probably not the trendiest light fixture, but it looks several decades more current than the last one and will work fine for a while!

I have never done any electrical work at all before, but I watched about a dozen youtube videos to learn how to do it. The instructions that came with the light fixture were so unhelpful, it would have been less confusing if they gave NO instructions. Of course you need to be super careful and connect everything the correct way, but it wasn't too difficult. I had to stop a hundred times and check to make sure I was doing it right, but it wasn't hard.

Here is the youtube video from Home Mender that I found most helpful for my situation:  https://youtu.be/SjXe8PFz0Cg

The main problem that I ran into was that the new light fixture was shorter than the previous one, so when I started to attach it to the wall, there was a gap on top AND bottom where you could see old paint and even a little bit into the electrical box. I knew I would need to repair the wall to cover those gaps, so I didn't attach the light fixture all the way yet. I got a drywall patching kit, cut 2 strips of patching and used spackle stuff that came with the kit to fix the wall. It dried in just a couple of hours, but I didn't get to finishing it right away. It was working and secured to the wall, just not totally bolted down.


the gap
A couple of days later, I finally got around to completing the job. I had to take the bulbs back out, face plate off, etc, so that I could bolt it down, but I've now securely attached the light fixture to the wall and we're good!


 It is really hard to get a decent photo in this little bathroom, so sometimes the walls look blotchy and purple, but they are actually solid white!


SaveSave

Wednesday, September 27, 2017

Rustic bathroom shelves


Our main bathroom medicine cabinet fell apart a couple of weeks ago (I suspect that children were using the cabinet door to hang onto as they climbed up on the sink).... the cabinet didn't look fantastic anyhow (the bottom shelf had already broken off), so when the door tore completely off, I knew there would be no hope of reviving it.

The old broken cabinet
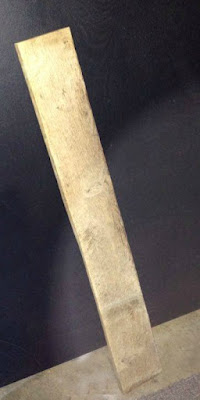
I didn't want to buy a new cabinet, because I figured the same thing would happen again... so I decided to put up shelves instead. I had some plain pieces of wood that I'd picked up from the Habitat for Humanity store for 25 cents each (and didn't use for a different project), which were perfect because I didn't have to cut them!

The wood was worn and somewhat uneven, but I thought it would look good (eventually). I painted each piece of wood with a mixture of brown, gray, and black craft paints that I had on hand until they had even more of a rustic sort of look. Then when they were all dry, I painted on a clear-coat of polycrylic (the clear coat will help to protect the wood from moisture and toothpaste, etc and make it easier to wipe off).

Unpainted wood


Next, I took the cabinet off of the wall and started prepping...

Had to paint over purple & blue behind the cabinet! 
measuring


Spray painted the hardware inside the old cabinet


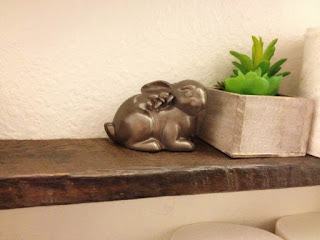
Here is the finished project! 


I purchased some simple brackets, some self-drilling drywall anchors, and some hammered-metal black spray paint (to spray on the brackets and screws). Total cost (including the three 25 cent pieces of wood) was about $14.


Thursday, July 20, 2017

KITCHEN COUNTER MAKEOVER - PAINTED COUNTERS


Our kitchen counters were a pale yellow (hard boiled egg yolk color) laminate with a brown "crack" pattern on them. They weren't cracked, they had a BROWN design on them that looked like CRACKS (why???). You can't really see the crack design very well in the photos (unless you got your face right up there to see the design, the counters just looked dirty). Gross.


Besides being a nauseating yellow color, there were a lot of cosmetic defects, like knife-cuts on the counters (i.e., someone not using a cutting board) and even some areas where small chunks had been chipped off of the laminate. There was also a small burnt area near the stove that was there before we moved in (looks like someone tried to put a hot pan on the counter). To make matters more awesome, some of the edge/trim pieces were coming loose on the ends and I kept having to glue them back on. 

I looked into replacing the counter tops, but something else caught my eye on Pinterest - PAINTED COUNTERTOPS. I felt like this would solve all of my problems - I could make them LOOK totally different and cover up all of the cosmetic problems (AND keep the trim firmly in place under layers of clear coat).

On Pinterest there are a lot of tutorials for how to paint countertops. Most of them use complete kits that you can buy (that includes all of the paint, brushes, clear coat, etc) such as http://gianigranite.com

The kits are really nice looking, but ultimately I went with THIS tutorial: https://lifeoflaurenlou.wordpress.com/.../finally.../amp/ because I already had a lot of these supplies and didn't want to buy a kit! 

To get the pattern I wanted, I first looked at photos (of different marble, granite, etc) countertops online until I found one I liked, then I used that photo as a guide for colors, pattern, etc. 

Basically you start by taping off the edges (to keep paint off of the walls, appliances, cabinets) like you would if you painted a wall. (I was concerned about the metallic-y trim around the backsplash that I hated, but I just painted right over it and it looked fine!)

Next, I filled in any chips and gouges in the laminate with paintable caulk. I also glued down the loose edges very well. I did not do anything to the tiny knife-cuts in the laminate, because I figured the paint would fill those in (it did).

Next, use a primer to prep the counters for the paint. I already had an off-white paint that contained primer and that worked fine for me. I had to use 2 coats to cover all of the yellow. If you want a white or light colored background, you use a light colored primer. If you want a dark colored background, you will need to use a darker primer (or use whatever primer and paint over it with a dark color). You can read more about this in the links with complete instructions above. 

I rolled a layer of regular white interior paint (that I had) over the primer before starting the design. This gave me the white base color that I wanted.

After your layer of paint has dried, you can start with your design. I used regular craft paint (the small bottles of 50 cent craft paint that they sell at Walmart or any craft store). I started with broad strokes and then adjusted it as I went (added more stripes if an area looked bare, or added more white if it seemed too busy). I used a variety of colors to add depth. This photo shows an early stage of painting the design.

This painting process took me several days (FOR EACH SECTION I DID) of painting, waiting for it to dry, looking at it a lot, and touching up before I even got to the clear-coat. Of course, I wasn't working around the clock, just when I had spare time, so if you could power through you could get it done in less time.

I felt like layering the paint gave a more realistic look, so I took my time. I would often go over a (dry) painted area with a slightly watered-down white paint to mute the colors and brush-strokes.

After I was ok with how the design looked, I went back in with small paintbrushes and sponges to add detail- splotches, etc. I used a variety of colors (using the photos I found online) - dark gray, black, tan, grayish green, light gray, dusty blue, and purple.

Since this took a while, I only did one section of counter at a time so we could still prepare food, wash dishes, etc.

The most time-consuming part of this process is the final step - the clear coat. I used Clear gloss Minwax Polycrylic. You have to let it dry for several hours in between coats (and then lightly sand and wipe off before adding another coat). I applied 6 coats to each painted area because I wanted it to be durable.

One of the articles that I read said to use small amounts of ultra-fine glitter in some areas (between layers of polycrylic) for a more realistic look. John was nervous about glittery counters, but if you don't over-do it and just add it to select areas of the design where glittery deposits might naturally be, it really adds a nice depth and makes the counters look more like "real" rock.

In the end, since I already had brushes, craft paint, painters tape, and primer, the only thing I bought was the Clear coat (about $16 at Walmart). I probably spent about 20 hours on this project (not counting drying time).


Here is a final look at the before and afters! 


MINIMALISM HOME - LESS TOWELS = MORE TOWELS


John and I recently gave away about half of our bath towels. Before that, we were always running out of towels. It might seem counterintuitive to get rid of towels when you don't have enough towels, right?

Here's the deal:

We have 4 kids (a baby, 2 pre-teens, and a teen) who share a bathroom, and we also have a bathroom in the master bedroom. No matter how many towels I would put in the girls' bathroom, they would ALL be used within 1 day. Seriously. Then when those towels were gone (thrown in a bedroom laundry basket or on the washing machine), then the kids would start taking clean towels from the master bathroom AND the spare bath towels in the hall closet. So, often when someone would go to take a shower, guess what? Not a dry towel to be found in the whole house!

In most cases, towels are used to dry off clean people and can reasonably be re-used a few times (at least) if they are hung to dry after use. Obviously there will be some exceptions, but there shouldn't be SO MANY exceptions that we are using 20+ bath towels a day.

I try to only do laundry 2x a week (or more often if there is a "situation"), but I would have to do more laundry every time the towels became scarce or non-existent (pretty much every day). Of course, I could track down the wet towels, but by the time I found them they would be soaking everything in a laundry basket somewhere. And the laundry would start up again!

On the rare occasion that one of the kids would put their towel back, it would inevitably end up on the bathroom floor anyhow, because our towels are on the heavy side and the rack of hooks of the back of the door is sort of slippery. Towels easily slide off. Then someone's towel becomes a bonus bath-mat for the next shower, and everything ends up in the laundry again.

To fix our disappearing-towel problem, we gathered up all of the towels in the house and decided which ones we wanted to keep. Generally, these were the nicer looking of the towels. The rougher looking towels were automatically in the "get rid of" pile. We got rid of about 10 bath towels.

This loop system from designmom.com
is similar to the loops I made
I was nervous about not having back-up towels, but we had a plan:

FIRST, certain towels would be assigned to certain people.
SECOND, we would make those towels easier to hang up (and stay hanging up)

We had 3 "Frozen" theme towels for the little girls (one with Olaf, one with Anna, etc). These particular towels weren't the newest (or the classiest), but we decided to keep them, so each of the younger girls would have her own specific towel. I sewed a loop of elastic on the side of each one, so that they can hang to dry on the hooks on the back of the bathroom door (the towels always seemed to slide off the hook before I added the elastic loops, this solved the problem!)

I used plain white elastic loops for our towels. In the photo here, they have used colored ribbon with same-color towels (assigning a ribbon color to a specific family member), which is another way to go. Ribbon probably works just as well as elastic, but I like that elastic has a little "give."

The rest of the towels we already had were regular (non-cartoon) of the same type & brand, and we had 2 of each specific color. We decided that the 2 blue towels would be for John, the 2 purple towels would be for me, and the 2 coral towels would be for our teenage daughter. We put these on the hanging towel racks in the bathrooms to dry when not being used.

(PS- Part of my concern with getting rid of extra towels was that we wouldn't have any nice towels if we had relatives visiting, because they would all be in constant use, so we also kept the 4 nicest towels (all dark blue) and put them away for when we have overnight guests)

Any towels that were not part of the system (or my 4 guest spares) were donated.

We all now have our own assigned towels, which each have a specific place to hang dry in between laundry days. I can easily see whose towels are missing (weren't hung up) and that keeps some accountability in the system...if towels start disappearing, I will be able to tell who the culprit is pretty easily. If I see a purple towel in the little girls' laundry basket, I know that something is amiss!

We've been using this minimized assigned-towel system for a month (using 1/2 the number of towels that we used to have), and we haven't run out of towels or had a towel-stealing incident since!
Less towels + assigned towels + loops making it easier to hang towels up = less laundry.


Friday, July 14, 2017

MINIMALISM HOME - START WITH DISHES


John and I are not what I would consider extreme minimalists. We have watched several documentaries about minimalism, and read many articles...but we are by no means experts. We just really want to start "getting our act together" when it comes to clutter and excessive possessions. We have started applying the concept of minimalism in our home (in our own way) in order to help us reign in the chaos of 4 kids and 6 busy lives.

You can apply the concept of minimalizing into many areas of your life, but I will mainly be talking about minimalizing in the home...

The basic idea of minimalism in the home is to clear out what you have laying around your house that is unneeded, unwanted, or otherwise weighing you down. Maybe you have 2 sewing machines, so you could choose to sell/give away/donate the one you like/use the least? Not only would you make a bit more space in your closet, but you'd also get rid of that voice in your head that says "you really need to get rid of that old thing" each time you see that extra sewing machine sitting there.

Maybe you're holding on to a lot of items (that you don't really want) because of sentimental reasons? Or maybe you're keeping a lot of things around "just in case" (like clothes that fit 10 years ago)?

In watching documentaries about minimalism, they tend to showcase very extreme cases of people who have gotten rid of almost everything they own. I'm not interested in that - I just want to make room in my life to have and do what I really want to.

For us, the appeal is not necessarily having "less things," but the benefits that come with having less things.

One fairly extreme example that we saw was a family got rid of all of their dishes and eating utensils except for 1 plate, 1 fork, and 1 glass for each family member. (All I could think was - No bowls? No spoons? What if they want to have soup?)

Another example we saw was a man who realized that he didn't need 3 pairs of shoes, so he gave away two pairs and now just owns one...which seemed to work fine for this individual, but for me, this goes against reason. One day his only pair of shoes will get a hole in it, or the sole will come off, and he will need a new pair of shoes. This might happen during the workday, or on a date. Maybe money is no object for him, but  someday this will happen and he will have no choice but to pay full price for a new pair with little or no notice (and no time to watch for sales). Personally, I think that it would have made more sense for him to hold on to a second pair in reserve (or maybe even rotate between two pairs?). But I digress...

The concept is to get rid of things that YOU don't think you need. (PS- That spoon-less and bowl-less family was ok with their choices, but I need spoons for ice cream, so that won't work for me).

The idea of minimizing your home is to get rid of what you feel comfortable with, and my idea of comfortable will be different than yours.

In one of our first minimalism efforts, John and I recently decided to pare down our dishware and silverware, because we had a large amount of mis-matched items and too many of everything. We have a temperamental dishwasher, so we usually end up washing everything by hand. If it is a busy day and the dishes don't get done right away, that doesn't stop the younger kids from getting a second or third glass (each) for water throughout the day, or using bowls and serving spoons to make concoctions. Not to mention the baby bottles and sippy cups that multiply like crazy. So we could easily go from a reasonable sink-full of dishes to a major every-dish-is-now-dirty situation in a single day. Then someone (usually John) would have to do ALL (or most of) the dishes at the end of the day, and it would take a really long time.

We considered having one "place setting" for each person in the family. My concerns were: #1- What if we have guests? #2- I often use dinner plates for other things (like defrosting chicken in the microwave) and it just wouldn't be practical to only have a few plates that I have to keep re-washing during meal prep. So we decided that we would keep 6 dinner plates, 6 saucers, 6 bowls, and 6 glasses in the cupboard (and 6 each of forks, spoons, knifes, etc in the silverware drawer). These are all from a set I got as a Christmas gift years ago, so they match (but are now discontinued). The baby doesn't use dishes or silverware yet, so this gives me a little leeway to use extras for cooking/serving. We also keep the rest of the dishes from the same set in an upper cupboard (that isn't conveniently reachable in a lazy moment of not wanting to wash dishes) in case we have dinner guests. Or if a dish breaks, we have those extras to draw from. Any other odd dishes or glasses that we used to have were donated to Goodwill.

And guess what - we have all survived for months like this, and still have plenty of dishes to use without any problem. Turns out we don't need 30 dinner plates for 5 people & a baby. If we wash the dishes after meals, it doesn't take long and we have our dishes ready for the next meal. And there is never any big pile at the end of the day.

A concern that I sometimes have about getting rid of "extras" is that items eventually will need to be replaced and (like in the single pair of shoes example I mentioned above), you will have limited options in replacing those items. I don't consider it "hoarding" to have backups of things that I will reasonably need soon. Especially if I already own them. I don't need to run out to buy a brand new printer just in case mine breaks someday, but if I rely on my printer for work or school and have a perfectly good extra one on hand, I might consider keeping it for that reason.

If shampoo is buy 1 get 1 free, of course I won't throw out the extra bottle, because I will need it eventually.

Recently,  a relative gave us a complete set of dishes that they no longer need. I hesitated to take them, because we have our system going now. But at the rate we break our dishes, it won't be long until we won't have enough from the original set to keep this going. So we've put away the "new" set of dishes for when the time comes. At that point (when I'm down to less dishes in the original set than  we need), I will donate the original set and break out the "new" set.

Again, I don't have backups or extras of everything. I don't want to keep things around that I don't need, but I also don't want to be wasteful. So there are a lot of little decisions to be made.

I will be posting more about our minimalist journey every week, please let me know if you have any questions or requests!

Friday, May 19, 2017

dresser makeover - ombre chalk paint


We had an old dresser that had been used by everyone in my family - my parents, both brothers, and myself at different points in our lives. It was pretty rough looking and there was a significant amount of sticker reside that I didn't want to mess with. But also this dresser couldn't really be used as-is anymore.

So out comes the chalk paint -

I did no prep work. I didn't clean off the sticker residue at all. I just painted right over it and thats one of the reasons I like chalk paint - it covers stuff up nicely. The directions will tell you to clean the surface before painting, but I have never had a problem so far.

I had a small jar of light gray chalk paint that I had purchased (before I realized that I could make my own). I painted the top drawer with that, then added a small amount of black to make the color darker as I painted the next two drawers. I also had some black chalk paint already mixed, so I used that for the bottom drawer and the top of the dresser here. I also put a clear-coat of polycrylic (on the top surface only) when I use chalk-paint because people tend to set drinks on there and that doesn't mix well with chalk paint.

I kept the body of the dresser and the knobs the original dark wood color. I touched up a few of the wooden knobs with similar brown craft paint that I had around, that happened to match perfectly!

Now I can use this dresser in my bedroom and not have to worry about it looking gross!

Tuesday, April 11, 2017

"Mudroom" closet

We had a large hallway closet with clunky sliding doors that is the first thing you see when you come in the front door. I've tried replacing the sliders, but the doors never quite sat right and always looked horrible. But not as horrible as whatever we'd shoved back there before we closed the doors - a million coats, shirts to iron, stuff for Goodwill, and whatever else we didn't know what to do with. I have no idea why the photo is black and white, I will blame the kids for that....


The thing we hated most about this closet is that we would shove things in there out of convenience, which created a big mess that we'd eventually have to sort through if we wanted to find something. Our idea was to remove the doors and the clothing rod, and make it a mudroom style area. Not that we really need a mudroom, but I just wanted it to look nice and keep everyone from shoving things in there... so, like a mudroom, but just for looks...

Oh and by the way, when we did have guests over, they definitely could not hang up their coats, because there was no room and the closet was too messy to open, anyhow! So if you're wondering if we would "lose" room by eliminating a true closet, the truth is - not really, because it was not really storage space as much as it was a black-hole of junk!

Here is what the closet looked like after I took off the doors, removed all of the hanging coats, etc and the hanging rod, plus a lot of the junk that was piled in the closet (yes, there was more - much more). I also took one of the boards that comprised the two-board deep shelving out (but it got wedged in, as you can see in the photo, and it took me a while to figure out how to get out)


We wanted to add some molding and paneling, and I already had some textured wallpaper that looks like beadboard, so I decided to give that a try. It wasn't hard to put on, but if I ever want to add beadboard anywhere else in the house I will just buy the real thing. This wallpaper looks good, but it dents very easily. I've already spent a lot of time patching it and trying to repair ripples along the edges (I did carefully follow the instructions). Basically if you lean anything on it, or anything is touching it, OR if you slip and fall on it when you're caulking, it will make a dent.

Here I am measuring the wall and marking it with the backside of my wallpaper "beadboard"...


A piece of the wet wallpaper "beadboard" before I applied it to the wall....


After I put the wallpaper up.... (its uneven on the bottoms, but I didn't worry about that part because it was going to be covered by wood). You might also notice that large (and tacky) piece of wood on the bottom left side of the closet. The master bathroom is on the other side of this closet, so I believe that this wall was used to access the plumbing at some point, and this wooden patch was placed over the drywall that was removed. It really is an eyesore (they used really thick wood, so it sticks out about an inch from the wall). I considered replacing it with something less horrible, but then I decided I'd better just leave it alone in case we need to access the plumbing in the future. But I would definitely need a way to hide it...


Next I added the wood trim/molding under the shelf, at the bottom of the "beadboard," etc. and caulked, then painted it all the same white color. I added 5 brushed-nickel hooks (here I am checking the placement of the hooks by attaching them with painters tape before I actually attach them)...


In the photo above, you can also see that I am checking to make sure that the base of my bench will fit. I added 4 "legs" to a piece of wood that I already had (an old shelf piece that I didn't want, that I cut 5" off of to make it the size I wanted and then roughly painted white over the brown). I attached the legs using this hardware that I found at Lowe's. The bench would have been fine without adding the legs, but I needed a few extra inches of height to cover that square wood patch that I mentioned before....


I got these plain wooden crates at Michael's, then sanded & painted them white, then bolted together...


Here is the bench with the top and bottom pieces attached... I painted another piece of wood with what I call "faux-stain" (basically I just water down craft paint and paint on so that you can still see the wood grain and then cover it with a layer or two of polycrylic clear coat). This is the same as I did with the top for our entertainment/media center (see that post for more info). Its a dark brown color with the wood grain showing through for a rustic sort of look. 

I used wood screws to attach the top and bottom to the crates.


And here is the finished project! I think it makes the entry area of our home seem more roomy and bright. And I don't have to worry about people shoving junk in there, because there is no door to close!  

The first thing my kids said was, "can we put our coats and shoes in here now?" Why no, no you can't. We actually have an area in the entryway from the garage (where we actually enter the house) to put shoes, etc. This one is just for looks, people! And guests, too, I suppose. :)